 recording history
WestGrid Summer School
Marie-Hélène Burle
training@westgrid.ca
Run the commands in this lesson on your machine to familiarize yourself with Git!
Remember our 3 components from the previous lesson?
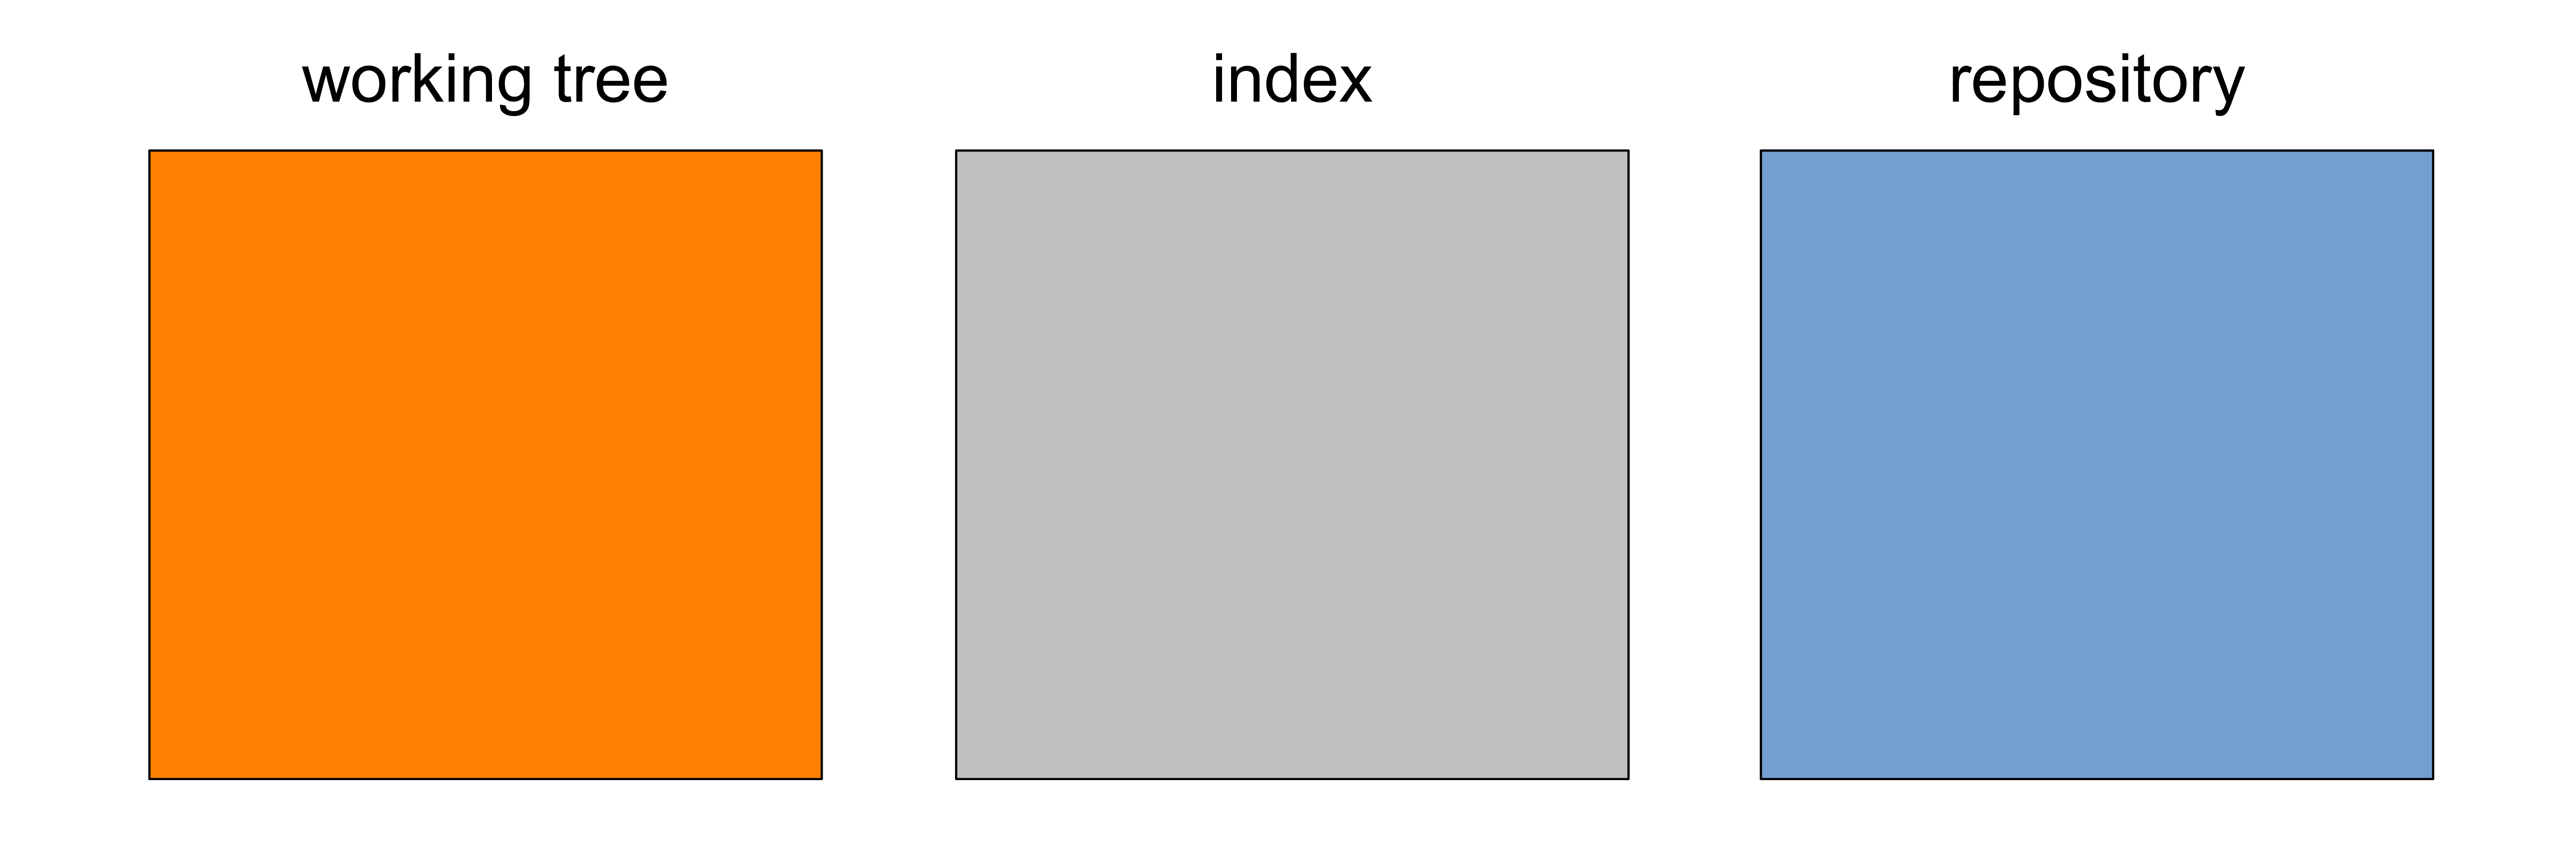
How do we create them?
Let’s try it!
First, we need to create a project: this means creating a directory.
Let’s call it git_lesson .
Make sure never to use spaces when you use Git. It will make your life a lot easier.
Open a terminal
Windows: Git BASH
MacOS: Terminal
Linux: any terminal emulator
Create the root of the project
cd /path/where/you/want/your/repository
mkdir git_lesson
You can place your project wherever you want on your computer. Simply make sure that you know where it is and that it is somewhere sensible.
All files for this project need to be in this directory: it is the root of the project.
Git will only “see” files within this directory.
Of course, you can create subdirectories in it to organize your files.
Navigate to the directory in your usual way
This may be with Windows explorer or Finder.
Realize that there is nothing special about this directory.
Turn the directory into a repository
To put our project under version control, we initiate the repository.
Make sure that you are in the root of the project!
cd git_lesson
pwd         # this should return the path to git_lesson
The directory is empty:
ls -a # this should not return any file or directoryInitiate the repository
git init
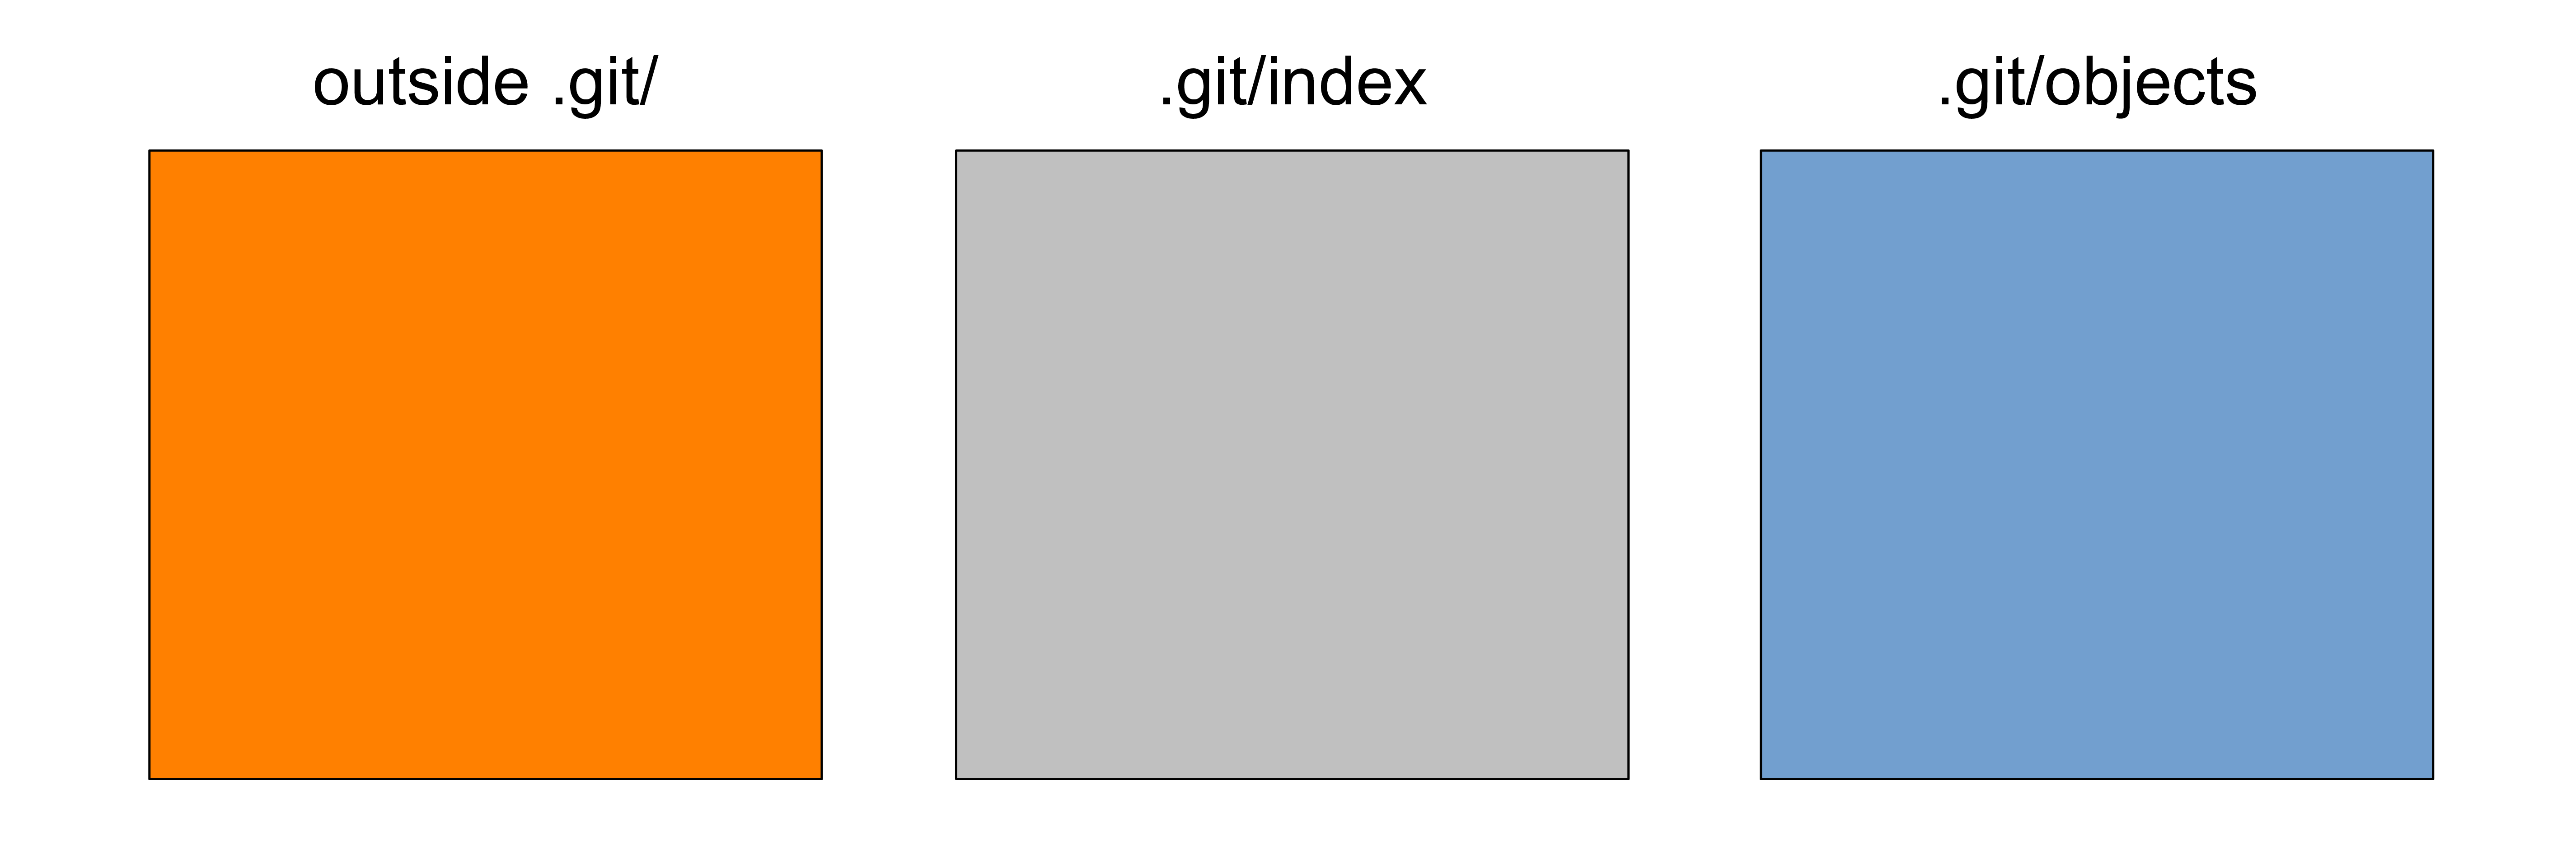
You now have in your root folder a very important directory: .git
.
ls -a # make sure that you can see the .git directoryNote: we need the -a flag because files and directories starting with a dot are hidden.
Go see it with your usual tool
Go back to your directory with Windows explorer or Finder to demystify it.
If you don’t see it, make sure to change the options to see hidden files.
Go have a look at what is inside
So, what is what?
So, what is what?
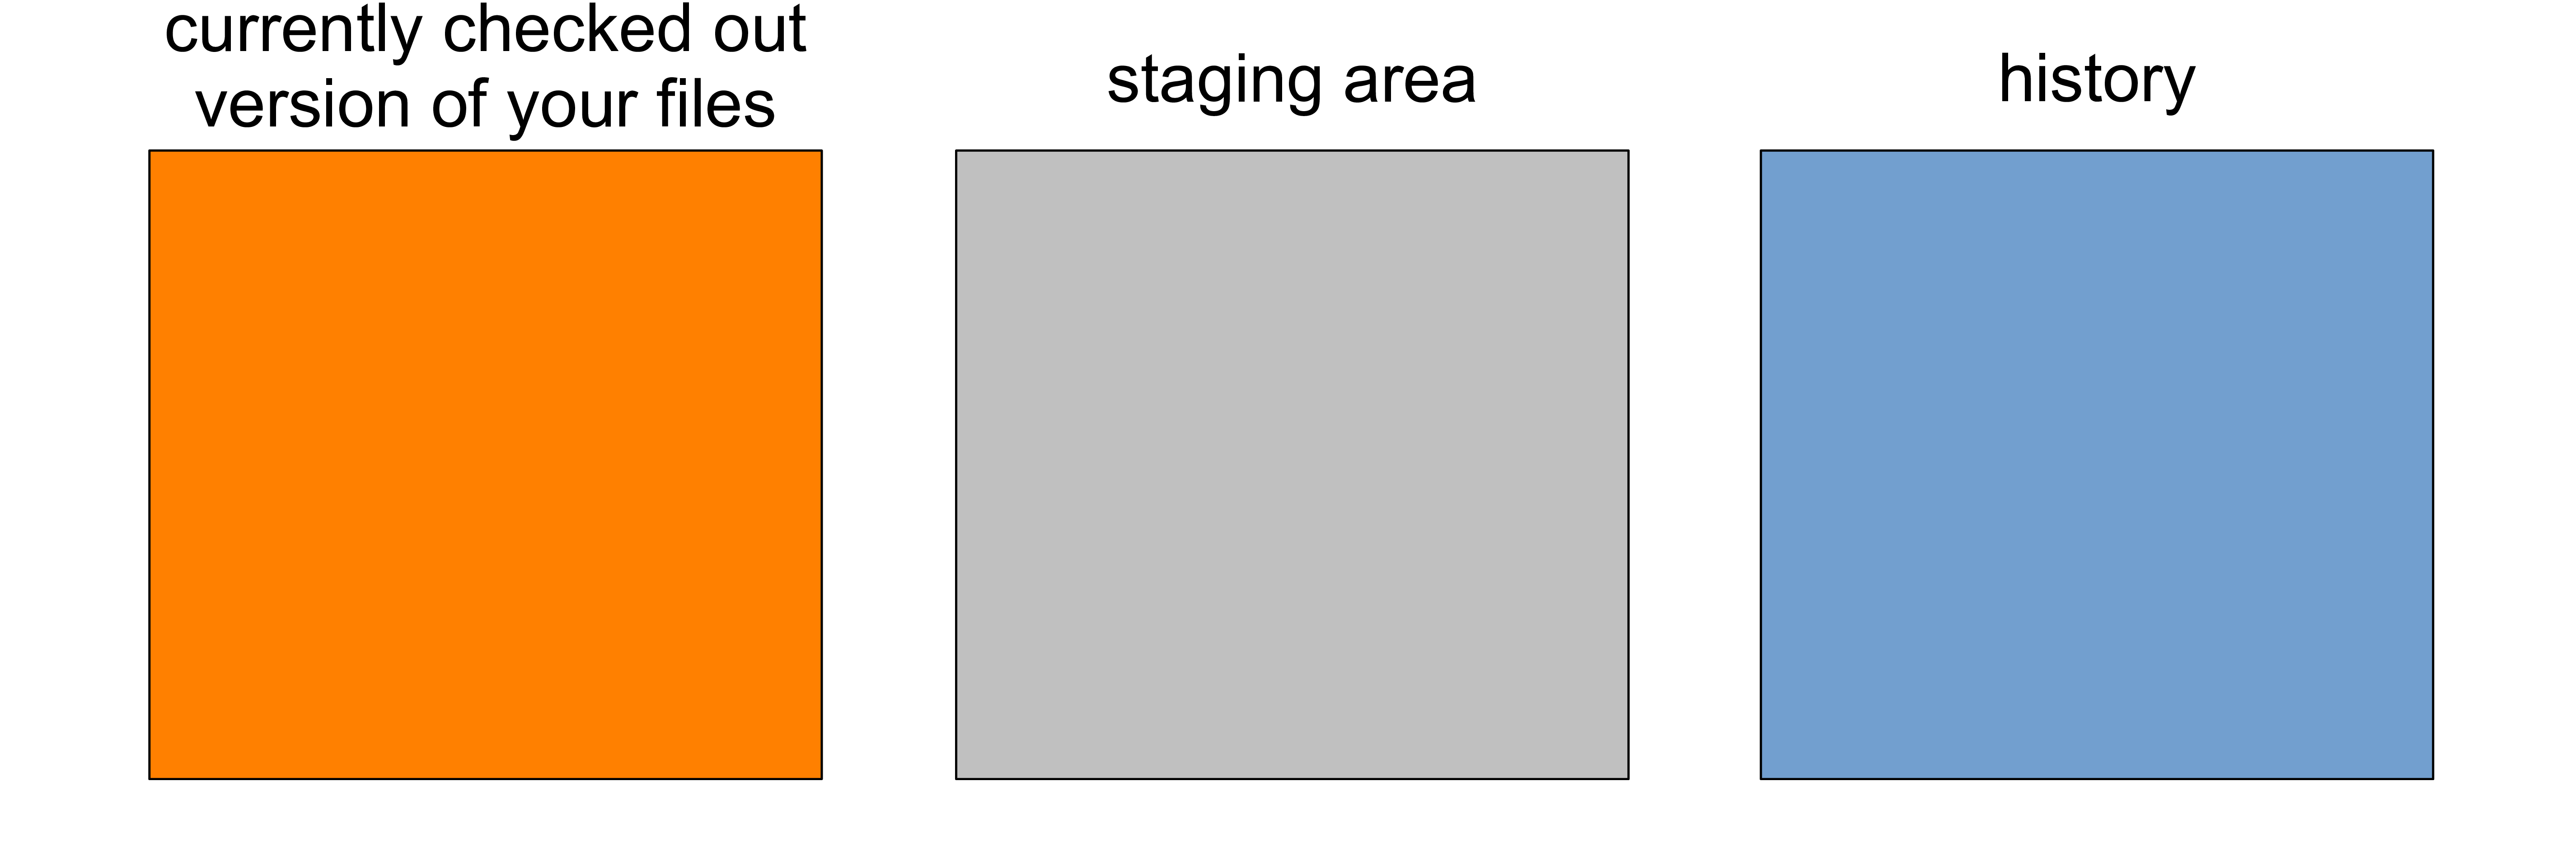
So, what is what?
Status of a repository
Whenever you want to know what is going on in your repository, run:
git status
What is the current status of your repository?
Now create 3 files in your new repository
touch file1.txt
touch file2.txt
touch file3.txt
You can see your files if you run:
ls -aAdd content to your files
Add several paragraphs in each of your 3 files.
You can type random words, copy and paste a few paragraphs from a page web, or use Lorem ipsum
… it doesn’t matter what the content is.
From the command line, you can use, for instance:
echo "your text" > file1.txt
If your text is long, pasting it in the terminal can be weirdly slow,
so you can open a text editor (e.g. nano):
nano file1.txtpaste your text, save, and close the editor.
Inspect your repository now
How do you inspect a repository again?
Was it something with “status” maybe? If you forgot, go back a few slides.
What has changed?
You need to start tracking your files
Before you can do anything, you need to put your files under version control.
For this, you first stage them:
git add .           # stage all changes
git add <file>      # stage <file>
Start tracking your files
For example, you could stage file1.txt
first:
git add file1.txtRun git status to see what happened.
Then you could stage the remaining 2 files with:
git add .Run git status
again.
Note: don’t hesitate to use Tab for completion.
Take a first snapshot of your project
Staging does not record the history of your project. The staging area is only a way to organize your next commit by bringing together changes that make sense to re-group in a snapshot of the project.
You write the history of your project—something that will not get lost—by committing. A commit is one such snapshot of your project.
Your first commit
You create a commit with git commit
.
But Git will not allow a commit without a message describing it. So if you only run the command above, Git will open a text editor in which you can enter your commit message.
If you want to commit without using a text editor, you must use the -m
flag and a message within the command:
git commit -m "Your commit message"Commit messages
Do take the commit messages seriously. They will be key later on to navigate your history.
Messages such as “New commit” aren’t exactly helpful.
Make sure to describe what you did in the changes you are committing.
Traditionally, the first commit message is “Initial commit”.
So a first commit often looks like this:
git commit -m "Initial commit"But you can add information, for instance by listing the new files that you added to the project.
Commit messages good practice
- Use the present tense
- The first line is a summary of the commit and is less than 50 characters long
- Leave a blank line below
- Add the body of your commit message below that
Commit messages good practice
So if you want a more informative message than simply “Initial commit”, this would be a good message:
git commit -m "Initial commit
dquote>
dquote> add file1.txt with bla bla bla
dquote> add file2.txt
dquote> add file3.txt with this and that"
Make your first commit
SHA-1 checksum
Each commit is identified by a unique 40-character SHA-1 checksum. People usually refer to it as a “hash”.
The short form of a hash only contains the first 7 characters, which is generally sufficient to identify a commit.
After you committed, Git gave you the short form of the hash of your first commit.
SHA-1 checksum
Note
You can get the hash of any ref name (e.g. master, HEAD, etc.) with these commands:
# Get the full hash
git rev-parse <refname>

# Get the short version of the hash
git rev-parse --short <refname>

# Get <n> digits of the hash
# Note that Git will always at least give you the necessary digits to uniquely identify the hash
git rev-parse --short=<n> <refname>

# Show the entire hash with the digits necessary to uniquely identify it in color
git rev-parse <refname> | GREP_COLORS='ms=34;1' grep $(git rev-parse --short=0 <refname>)
Inspect your repository again
Getting more information on changes
Make changes to your files (add text, delete or re-write sections, etc.)
git status gives you information on which files are modified.
What if you want to see the actual changes?
The command for this is:
git diffGetting more information on changes
By default, git diff uses a pager (e.g. less ).
You scroll down with the Space
key and you exit with q
.
You can circumvent the pager with:
git --no-pager diff
Run git diff
on your repo.
More on staging
Earlier, we staged our new files to start tracking them with Git.
You will have to stage them again each time you want to commit new changes.
But you don’t have to stage all changes to make a new commit as we did earlier. You can stage only one file or a combination of files.
You can even stage only sections of files (called hunks) with:
git add -p <file> # start interactive session to stage hunks of <file>Interactive staging
Try it on one of your files (this will be nicer if you made several modifications in different sections of your file).
If file2.txt
is one of the files in which you made changes:
git add -p file2.txtInteractive staging
After each hunk (fragment with modification), Git will ask you to type one of:
y	yes (stage this hunk)
n	no (don't stage this hunk)
a	all (stage this hunk and all subsequent ones in this file)
d	do not stage this hunk nor any of the remaining ones
s	split this hunk (if possible)
e	edit
?	print help
There are more options , but these are the main ones to remember.
Ignoring files
There are files that you should not put under version control.
Output files (e.g. graphs, transformed data, etc.) which can be re-created simply by running a script are a great example.
But you don’t want to leave them as untracked files (or you would never have a clean working tree, which is a problem). You need to tell Git to ignore them.
For this, you add them to a file that you create called .gitignore
Ignore a file
Create file4.txt and add it to .gitignore
touch file4.txt               # write something in it if you want
git status
echo file4.txt >> .gitignore
git status
Feel free to keep playing in your repo with these commands until they become more familiar
If you aren’t sure about something, try it out. Experiment to understand how Git works.
You can also look up the Git book](https://git-scm.com/book/en/v2) and countless great answers on [Stack Overflow .
![]()
Questions?
Bring all your questions to tomorrow morning's live session
. See you there!